React.js Note
Intro
- React is a JavaScript library for rendering UI
Components
- React is all about Components
- A component is a piece of the UI that has its own logic and appearance
- We don’t have to manipulate DOM manually anymore with components
- A component is just a JavaScript function
- Their names always begin with a capital letter
- They return JSX markup
- React application begins at a “root” component
JSX
- JavaScript XML
- A syntax extension for JavaScript that lets you write HTML-like markup inside a
.jsfile - Rules of JSX
- Return a single root element
React.createElement()is invoked behind the scene- Built-in tag
<Fragment>- Alternatively written as
<>...</> - It’s an empty tag
- Let you group things without leaving any trace in the browser HTML tree
- Alternatively written as
- All tags must be closed
camelCaseallmost of the things
- Return a single root element
- Dynamic data:
{}- As text directly inside a JSX tag
- As attributes immediately following the
=sign - Any JavaScript expression will work between curly braces, including function calls
- Fundamentally, JSX just provides a syntactic sugar for the
React.createElementfunction
props
propsare the information that you pass to a JSX tagProcess
- Set
props: Add custom attributes onto the custom HTML elements (components) - Merge into object: React merges all
propsinto a single object - Receive
props: Components (the function) will accept thepropsas the first argument
- Set
Conventionally the parameter is named with
propsUsually you don’t need the whole
propsobject itself, so destruct it into individualpropPass
propsthrough multiple componentsfunction Profile(props) { return ( <div className="card"> <Avatar {...props} /> </div> ); }- De-constructing or setting default values on
props:...
- De-constructing or setting default values on
Composition of components
When you nest component in another component, the parent component will receive that content in
props{props.children}Like a wrapper
import Avatar from "./Avatar.js";

function Card({ children }) {
  return <div className="card">{children}</div>;
}

export default function Profile() {
  return (
    <Card>
      <Avatar
        size={100}
        person={{
          name: "Katsuko Saruhashi",
          imageId: "YfeOqp2",
        }}
      />
    </Card>
  );
}
Trick: Pass a component identifier as a value for a
propto dynamically render different components inside a component
- That
propshould be named with a start of capital letter- The value: default element: ; customised element:
propsare immutable- When a component needs to change its props (for example, in response to a user interaction or new data), it will have to “ask” its parent component to pass it different
props— a new object
- When a component needs to change its props (for example, in response to a user interaction or new data), it will have to “ask” its parent component to pass it different
Conditional Rendering
- Shortcuts:
<condition> ? <content1> : <content2>,<condition> && <content>
Rendering Lists
map,filter: array of objects to array of JSX markupkey- You need to give each array item a
key - A string or a number that uniquely identifies it among other items in that array
- Useful for future manipulations
- Do NOT generate
keyon the fly, instead you should include them in your data - Where to get your
key- Data from a database or API: use their keys
- Locally generated data: use an incrementing counter
crypto.randomUUID()or a package likeuuidwhen creating items
- The components won’t receive
keyas aprop, it’s only used as a hint by React itself
export default function List({ people }) { const listItems = people.map(person => ( <li key={person.id}>{person.name}</li> )); return <ul>{listItems}</ul>; }- You need to give each array item a
Keep Components Pure
Components should only return their JSX, and not change any objects or variables that existed before rendering
- It’s totally okay to change variables and objects that you’ve just created while rendering inside the component functions
React offers a “Strict mode” in which it calls each component’s function twice during development
By calling the component functions twice, strict mode helps find components that break these rules
Strict mode has no effect in production
- In React, side effects usually belong inside event handlers
- Even though event handlers are defined inside your component, they don’t run during rendering! So event handlers don’t need to be pure
- As a last resort, use
useEffect
Interactivity
Event Handlers
You can respond to events by declaring event handler functions inside the components
export default function Button() {
  function handleClick() {
    alert("You clicked me!");
  }

  return <button onClick={handleClick}>Click me</button>;
}

// if the handler accept parameters, a common pattern for using it is:
// <button onClick={() => handleClick(params)}>Click me</button>
Often you’ll want the parent component to specify a child’s event handler and pass it to the child as a
propBy convention, handlers should start with
handle; handlerspropshould start withonOn all built-in HTML elements we have full access to all native DOM events
Built-in components only support browser event names
Custom components can have custom handler name
Event handlers receive an event object as their only argument. By convention, it’s usually called
eAll events propagate in React except
onScroll, which only works on the JSX tag you attach it to- Stop propagation:
e.stopPropagation()
- Stop propagation:
e.preventDefault()
state
Why local variable isn’t enough
- Local variables don’t persist between renders. When React renders this component a second time, it renders it from scratch—it doesn’t consider any changes to the local variables
- Changes to local variables won’t trigger renders. React doesn’t realize it needs to render the component again with the new data
To update a component with new data, two things need to happen:
- Retain the data between renders
- Trigger React to render the component with new data (re-rendering)
stateis the component-specific memoryuseState(initialState)- A React Hook that lets you add a state variable to your component
initialState- The value you want the
stateto be initially
- The value you want the
- Returns
- The current
statevariable to retain data between renders - The
setfunction that lets you update the state to a different value and trigger a re-render- The
setfunction only updates the state variable for the next render
- The
- The current
import { useState } from "react";

function Component(props) {
    const [title, setTitle] = useState(props.title);
}
You can have as many state variables of as many types as you like in one component
stateis isolated and private- If you render the same component multiple times, each will get its own state
- State is fully private to the component declaring it, the parent component cannot change it
A
statevariable’s value never changes within a render, even if its event handler’s code is asynchronouspropsvs.state- Props are like arguments you pass to a function. They let a parent component pass data to a child component and customize its appearance. For example, a
Formcan pass acolorpropto aButton - State is like a component’s memory. It lets a component keep track of some information and change it in response to interactions. For example, a
Buttonmight keep track ofisHoveredstate
- Props are like arguments you pass to a function. They let a parent component pass data to a child component and customize its appearance. For example, a
Trigger, Render and Commit
The process of requesting and serving UI
- Triggering a render
- Component’s initial render, or
- The component’s (or one of its ancestors)
statehas been updated
- Rendering the component (Calling your component function)
- On initial render, React will call the root component
root.render() - For subsequent renders, React will call the function component whose
stateupdate triggered the render (this process is recursive)You may have thought about the performance issue, look at the Performance section
- On initial render, React will call the root component
- Committing to the DOM
- For the initial render, React will use
appendChild()DOM API to put all the DOM nodes it has created on the screen - For re-renders, React will apply the **minimal **necessary operations to make the DOM match the latest rendering output
- With the help of a virtual DOM
- For the initial render, React will use
- Browser paint the screen
- Triggering a render
Optimisation by avoiding unnecessary component function execution
memo()- Wrap the component function as a parameter of
memo() - Component function won’t execute if the
propsvalue are the same - Blocking a component execution will also block all children components execution
- However,
- Don’t overuse
memo() - Use it as high up in the component tree as possible
- Checking
propswithmemo()costs performance - Don’t use it on components where
propschange frequently
- Don’t overuse
- Wrap the component function as a parameter of
Refactor your project to a clever structure
Queueing a series of state updates
Batching
- React waits until all code in the event handlers or
useEffect()has run before processing your state updates
- React waits until all code in the event handlers or
Update
statebased on its previous valuePass a function to
setSomethingasnextState, which will be treated as an updater functionUpdater functions must be pure and only return the result
React queues this function to be processed after all the other code in the event handler has run
During the next render, React goes through the queue and gives you the latest updated
stateBy convention, name the updater function argument by the first letters of the corresponding
statevariableimport { useState } from "react"; export default function Counter() { const [number, setNumber] = useState(0); return ( <> <h1>{number}</h1> <button onClick={() => { setNumber(n => n + 1); setNumber(n => n + 1); setNumber(n => n + 1); }} > +3 </button> </> ); }
Update the DOM synchronously
flushSync(() => { setTodos([ ...todos, newTodo]); }); listRef.current.lastChild.scrollIntoView();- This will instruct React to update the DOM synchronously right after the code wrapped in
flushSyncexecutes
Using
flushSyncis uncommon and can hurt the performance of your app- This will instruct React to update the DOM synchronously right after the code wrapped in
Updating Objects or Arrays in state
- You shouldn’t change objects or arrays that you hold in the
statedirectly - Instead, when you want to update it, you need to create a new one (or make a copy of an existing one), and then set the
stateto use the copy - Treat
stateas immutable - Updating a nested object or array of objects: Immer
- To achieve deep clone
- How to use Immer
- Run
npm install use-immerto add Immer as a dependency - Replace
import { useState } from 'react'withimport { useImmer } from 'use-immer' - Now you can change the
statedirectly inside the updater function (syntax sugar)
- Run
Component Lifecycle
- A component mounts when it’s added to the screen
- A component updates when it receives new
propsorstate, usually in response to an interaction - A component unmounts when it’s removed from the screen
- All values declare in the component body are reactive
Managing state
Thinking about UI declaratively
Identify component’s different visual states
- Treat component as a state machine
- Have a
statevariable -status, and let it decide how the component should look like (return different markup)
Determine the human or computer events that trigger those state changes
- Set
statevariables to update UI
- Set
Represent the
statein memory withuseStateRemove any non-essential
state- Derive values from essential
states
- Derive values from essential
Connect the event handlers to
setStateComponents wrap controller and view together, but make them much easier to code and much less fragile
Principle for structuring state
- Group related state
- Avoid contradiction
- Avoid redundancy
- Avoid duplication
- Avoid deeply nested
state
Sharing state between components
- Lifting
stateup- Sometimes, you want the
stateof two components to always change together. To do it, removestatefrom both of them, move it to their closest common parent, and then passstateandsetStatedown to them viaprops
- Sometimes, you want the
- Uncontrolled components: components with local
state - Controlled component: the important information in it is driven by
propsrather than its own localstate - When writing a component, consider which information in it should be controlled (via
props), and which information should be uncontrolled (viastate) - Single source of truth
React maintain an UI tree (like DOM)
stateis tied to a position and component type in the treestateis held inside React instead of “living” inside the component- React preserves a component’s
statefor as long as it’s being rendered at its position in the UI tree. If it gets removed, or a different component gets rendered at the same position, React discards itsstate - It’s the position in the UI tree - not in the JSX markup
- Same components at the same position preserves
state - Different components at the same position reset
state
- Same components at the same position preserves
keycan be used to make React distinguish between any componentskeyisn’t just for listskeyis not globally unique, they only specify the position within the parentTrick: Use
keyfor resetting components at the same position- React will destroy the old component instance if the value of
keyhas changed - Unmount and remount the component
- React will destroy the old component instance if the value of
Context API
Prop drilling: passing shared data through multiple components layers
It can be a problem when you have too many
stateto manageSolution 1: Component Composition
ContextLets the parent component make some information available to any component in the tree below it—no matter how deep—without passing it explicitly through
propsHow to use
ContextCreate the context
Create a context in a new file and export it
// LevelContext.js
import { createContext } from 'react';

export const LevelContext = createContext(1);
// note: the value cannot only be states
The only argument to
createContextis the default value
Provide the context
If you don’t provide the context, React will use the default value
Wrap the component who provide context with a context provider
// Section.js
import { LevelContext } from './LevelContext.js';

export default function Section({ level, children }) {
  return (
    <section className="section">
      <LevelContext.Provider value={level}>
      {/* This tells React:
      		If any component inside <Section> ask for `LevelContext,
      		give them this `level`.
      		The component will use the value of the nearest
      		<LevelContext.Provider> in the UI tree above it
      */}
        {children}
      </LevelContext.Provider>
    </section>
  );
}
Outsourcing
contextandstateinto a separate Provider component is a common pattern
Consume the context
// Heading.js
import { useContext } from 'react';
import { LevelContext } from './LevelContext.js';

export default function Heading({ children }) {
  const level = useContext(LevelContext);
  // `useContext` tells React that the `Heading`component wants to
  // read the `LevelContext`

  // ...
}

// App.js
<Section level={4}>
  <Heading>Sub-sub-heading</Heading>
  <Heading>Sub-sub-heading</Heading>
  <Heading>Sub-sub-heading</Heading>
</Section>
React will re-execute the component function if the context value changes
You can also outsource
useContext(LevelContext)into the Provider component// LevelContext.js export function useLevel() { return useContext(LevelContext); } // Heading.js import { useLevel } from "./LevelContext.js"; const level = useContext();
Context lets you write components that “adapt to their surroundings” and display themselves differently depending on where (or, in other words, in which context) they are being rendered
In React, the only way to override some context coming from above is to wrap children into a context provider with a different value
Different React contexts don’t override each other
One component may use or provide many different contexts without a problem
Use case for
context- Theming: If your app lets the user change its appearance (e.g. dark mode), you can put a context provider at the top of your app, and use that context in components that need to adjust their visual look
- Current account: Many components might need to know the currently logged in user. Putting it in context makes it convenient to read it anywhere in the tree. Some apps also let you operate multiple accounts at the same time (e.g. to leave a comment as a different user). In those cases, it can be convenient to wrap a part of the UI into a nested provider with a different current account value
- Routing: Most routing solutions use context internally to hold the current route. This is how every link “knows” whether it’s active or not. If you build your own router, you might want to do it too
- Managing state: As your app grows, you might end up with a lot of state closer to the top of your app. Many distant components below may want to change it. It is common to use a reducer together with context to manage complex state and pass it down to distant components without too much hassle
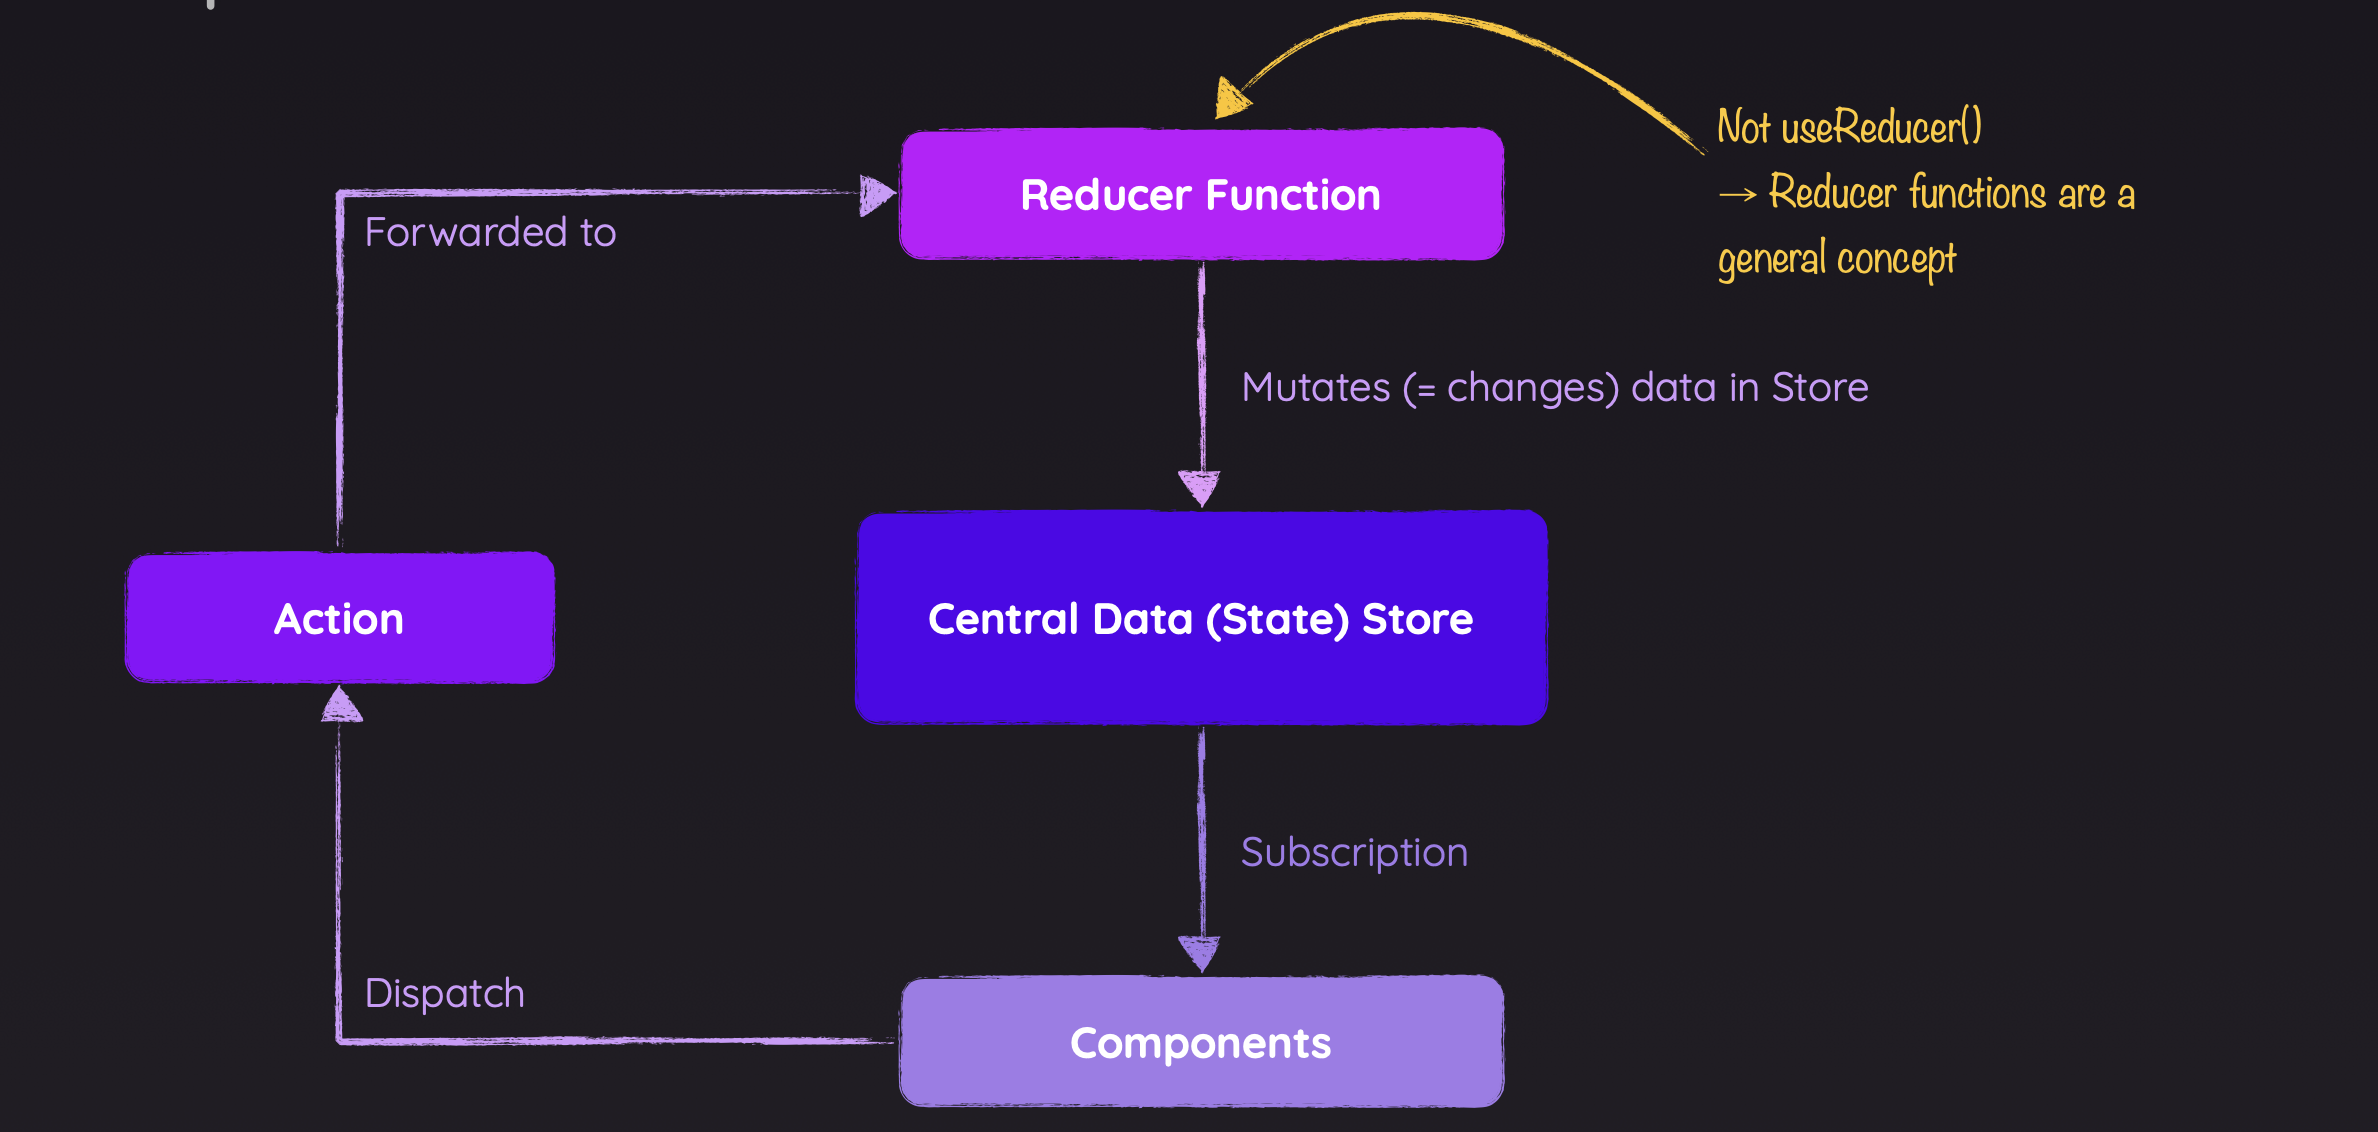
Reducer
A reducer in React or JavaScript programming is a function that reduce one or more complex values to a simpler one
You can consolidate state update logic with a reducer outside your component in a single function, called
reducerHow to use Reducer
Move from setting
stateto dispatchactions// From this function handleAddTask(text) { setTasks([ ...tasks, { id: nextId++, text: text, done: false, }, ]); } function handleChangeTask(task) { setTasks( tasks.map((t) => { if (t.id === task.id) { return task; } else { return t; } }) ); } function handleDeleteTask(taskId) { setTasks(tasks.filter((t) => t.id !== taskId)); } // To this function handleAddTask(text) { dispatch( // "action" object { type: 'ADD', payload: { id: nextId++, text: text, } } ); } function handleChangeTask(task) { dispatch({ type: 'CHANGE', payload: task, }); } function handleDeleteTask(taskId) { dispatch({ type: 'DELETE', payload: taskId, }); }- An action object can have any shapes, by convention it’s common to give a string
typethat describes what happened, and pass any additional information in an objectpayload
- An action object can have any shapes, by convention it’s common to give a string
Write a reducer function
- Declare the current
stateas the first argument - Declare the
actionobject as the second argument - Return the next
statefrom the reducer
function yourReducer(state, action) {
  // return next state for React to set
}
function tasksReducer(tasks, action) { switch (action.type) { case 'ADD': { return [ ...tasks, { id: action.payload.id, text: action.payload.text, done: false, }, ]; } case 'CHANGE': { return tasks.map((t) => { if (t.id === action.payload.id) { return action.payload; } else { return t; } }); } case 'DELETE': { return tasks.filter((t) => t.id !== action.payload); } default: { throw Error('Unknown action: ' + action.type); } } }- It is recommend wrapping each
caseblock into the{and}curly braces so that variables declared inside of differentcasedon’t clash with each other - Reducer function is declared outside the component function so that it won’t be re-created every time the component gets updated
- Declare the current
Use the reducer from your component
import {useReducer} from 'react'; // From this const [tasks, setTasks] = useState(initialTasks); // To this const [tasks, dispatch] = useReducer(tasksReducer, initialTasks);- The
useReducer()Hook takes two arguments:- A reducer function
- An initial state
- And it returns:
- A stateful value
- A dispatch function (to “dispatch” user actions to the reducer)
- If you want, you can even move the reducer to a different file
- The
Reducer must be pure
Each action describes a single user interaction, even if that leads to multiple changes in the data
Writing concise reducer with
immeruseImmerReducer- Reducers managed by
useImmerReducercan mutate their first argumentstateand don’t need to return the new state (remember tobreak)
refs
What is refs
When you want a component to store some information, but you don’t want to that information to trigger new renders, you can use a
refAdding a
refto your componentimport { useRef } from 'react'; const ref = useRef(0); // useRef returns an object like this: // { current: 0 }You can mutate
refinstead of using a set function, just change the value ofref.currentrefis mutable;stateis immutableWhen to use
refs- Storing
timeoutIDs - Storing and manipulating DOM elements
- Storing other objects that aren’t necessary to calculate the JSX
- Storing
Manipulating DOM with refs
DOM manipulation is the most common use case for
refsGetting a
refto the nodeconst myRef = useRef(null); <div ref={myRef}></div> myRef.current.scrollIntoView();Accessing another component’s DOM nodes
By default. React does not let a component access the DOM nodes of other components
A component can specify that it “forwards” its
refto one of its childrenconst MyInput = forwardRef((props, ref) => { return <input {...props} ref={ref} />; });<MyInput ref={inputRef} />tells React to put the corresponding DOM node intoinputRef.current. However, it’s up to theMyInputcomponent to opt into that—by default, it doesn’t- The
MyInputcomponent is declared usingforwardRef(). This opts it into receiving theinputReffrom above as the secondrefargument which is declared afterprops MyInputitself passes therefit received to the<input>inside of it
In design systems, it is a common pattern for low-level components like buttons, inputs, and so on, to forward their refs to their DOM nodes
You can expose component APIs via
useImperativeHandle()Avoid changing DOM nodes managed by React
Dealing with Effects
What is Effects
Two types of logic inside React components
- Rendering code
- Where you take the
propsandstate, transform them, and return the JSX you want to see on the screen - Renderer must be pure
- Where you take the
- Event handlers
- Nested functions inside your components that do things rather than just calculate them
- Event handlers contain “side effects” (they change the program’s state) caused by a specific user action
- Rendering code
Sometimes it isn’t enough
effectslet you specify side effects are caused by rendering itself, or parent components’statechange (which is, essentially, re-rendering itself), rather than by a particular eventFor example, a
statechange in the event handler of a component can cause some side effects that need to be handled in theuseEffectinside the child componenteffectsrun at the end of a commit after the screen updates. This is a good time to synchronize the React components with some external system (like network or a third-party library or browser APIs)
effects & dependencies
How to write an
effectDeclare an
effect- By default, your
effectwill run every render
useEffect(() => { // Code here will run });- By default, your
Specify the
dependencies- Most
effectsshould only re-run when needed rather than after every render - You can tell React to skip unnecessary re-running the
effectby specifying an array ofdependenciesas the second argument to theuseEffectcall - The
dependenciesarray can contain multiple dependencies. React will only skip re-running theeffectif all of the dependencies you specify have exactly the same values as they had during the previous render - You can’t “choose” your dependencies, linter does
useEffect(() => { // This runs after every render }); useEffect(() => { // This runs only on mount (when the component appears) }, []); useEffect(() => { // This runs on mount and also if either a or b have changed since the last render }, [a, b]);- React compares the dependency values using the
Object.iscomparison - The problem with object or function dependencies: infinite loop
effectexecute even if the dependencies are logically equivalent (with different pointers)useCallback()to solve this problem- Cache the function definition between re-renders
- Or, try to avoid them
- Mutable values (including global variables) aren’t reactive, so they shouldn’t be dependencies
- A mutable value like
location.pathnamecan’t be a dependency - A mutable value like
ref.currentor things you read from it also can’t be a dependency refcan be listed in dependencies but no point to do it because it’s never changed
- A mutable value like
- Most
Add cleanup if needed
- Some
effectsneed to specify how to stop, undo, or clean up whatever they were doing - Return a cleanup function from your
useEffect() - React will call your cleanup function each time before the
useEffect()runs again, and one final time when the component unmounts
useEffect(() => { const connection = createConnection(); connection.connect(); return () => { connection.disconnect(); }; }, []);- Some
A potential problem with
effectsandsetState: an infinte loopeffectexecute after rendering,setStateinsideeffectre-trigger the rendering- Solution: remove
statefrom dependencies and pass updater function tosetStateinuseEffect()
React will remount the
effectswhenever you save a file in development
When NOT to use useEffect()
- Some logic should only run once when the application starts. You can put it outside your components
- Those codes wil execute once the first time the file is imported
- Updating state based on
propsandstate- Calculate the value inside the component
- Etc.
React Hooks
- Hooks are functions that let you “hook into” React state and features from function components
- Functions starting with
use - Can only be called at the top level of your components or your own Hooks
- Can only call Hooks on the top level
useCallback()
Let you cache a function definition between re-renders
const cachedFn = useCallback(fn, dependencies);Return
- On the initial render,
useCallbackreturns thefnfunction you have passed - During subsequent renders, it will either return an already stored
fnfunction from the last render (if the dependencies haven’t changed), or return thefnfunction you have passed during this render
- On the initial render,
Usage
- You pass it as a prop to a component wrapped in
memo(). You want to skip re-rendering if the value hasn’t changed. Memoization lets your component re-render only if dependencies changed - The function you’re passing is later used as a dependency of some Hook. For example, another function wrapped in
useCallback()depends on it, or you depend on this function fromuseEffect()
- You pass it as a prop to a component wrapped in
useMemo()
Let you cache the result of a calculation between re-renders
const cachedValue = useMemo(calcValue, dependencies);Parameters
calculateValue: The function calculating the value that you want to cache. It should be pure, should take no arguments, and should return a value of any type. React will call your function during the initial render. On next renders, React will return the same value again if thedependencieshave not changed since the last render. Otherwise, it will callcalculateValue, return its result, and store it so it can be reused later
Return
- On the initial render,
useMemoreturns the result of callingcalculateValuewith no arguments - During next renders, it will either return an already stored value from the last render (if the dependencies haven’t changed), or call
calculateValueagain, and return the result thatcalculateValuehas returned
- On the initial render,
Usage
- You should only rely on
useMemo()as a performance optimization - Skipping expensive recalculations
- You should only rely on
Custom Hooks
Share logic between components
Hook names always start with
useCustom hooks let you share stateful logic, not
stateitself; each call to a Hook is completely independent from every other call to the same HookWhen to use custom hook
With time, most of your app’s
effectwill be in custom Hooks- You make the data flow to and from your Effects very explicit
- You let your components focus on the intent rather than on the exact implementation of your Effects
- When React adds new features, you can remove those Effects without changing any of your components
Keep custom Hooks focused on concrete high-level use cases
A good custom Hook makes the calling code more declarative by constraining what it does
Debugging React Apps
- Error messages
- Browser debugger
- “strict mode”
- A React component
StrictModeas an wrapper for other components
- A React component
- React DevTools
Class-Based Components
What & Why
- Functional component is the default and most modern approach
- Traditionally, which means before React 16.8, you had to use class-based components to manage
state - React 16.8 introduced React Hooks for functional components
- Class-based components CAN’T use React Hooks
Working with Class-Based Components
import { Component } from 'react';

class User extends Component {
  static contextType = UsersContext;
  // pitfall: can only link to one context

  constructor() {
    super();
    // For class-based component, state is always an object
    // And it also has to be a property named "state"
    this.state = {
      showUsers: true,
      more: "test",
    };
  }

  toggleUsersHandler() {
    // React will merge the new state object with the old one
    // this.setState({showUsers: false});
    this.setStae((curState) => {return {showUsers: !curState.showUsers};});
  }

  render() {
    const usersList = (
      <ul>
      	{this.context.users.map(user => <User key={user.id} name={user.name} />)}
      </ul>
    );

    return (
      <div className={classes.user}>
        <button onClick={this.toggleUsersHandler.bind(this)}>
        	{this.state.showUsers ? "Hide" : "Show"} Users
        </button>
        {this.state.showUsers && usersList}
      </div>
  	);
  }
}

// Component lifecycle methods
// A more imperative way, you have to add if block to specify when you want to skip the execution
componentDidMount() === useEffect(fn, []);							// Called once a component mounted
componentDidUpdate() === useEffect(fn, [someValue]);		// Called once a component updated
componentWillUnmount() === //cleanup function						// Called once a component unmounted
Error Boundaries
Right now (Nov 17 2023) this feature can only be used in class-based component
An error generated inside a component cannot be handled inside it, it should be treated as an information, and be catched and handled in the parent component
import { Component } from 'react';

// Wrap this error handler component around components should be protected by it
export default class ErrorBoundary extends Component {
  constructor() {
    super();
    this.state = {hasError: false};
  }

  componentDidCatch(error) {
    this.setState({hasError: true});
  }

  render() {
    if(hasError)
      return <p>Something went wrong!</p>;

    return this.props.children
  }
}
Handling HTTP Request
How to Connect a Back-end / Database
- Not all operations can be performed in the browser
- Cannot connect to a database directly
- Cannot access a file system
- Etc.
- Browser <-> Back Server <-> Database via HTTP
Fetching Data
useEffect()+fetch()- Handle loading status
- Handle HTTP errors
- Outsource
AJAX(url, config, initialData)helper function
useEffect(() => {
  (async function () {
    setIsFetching(true);
    try {
      const response = await fetch("http://localhost:3000/places");
    	if(!response.ok) {
      	throw new Error(`💥 Failed to fetch data! ${response.status}`);
    	}
      const data = await response.json();
      setPlaces(data.places);
    } catch(err) {
      setError(true);
      console.error(error.message);
    }
    setIsFetching(false);
  })();
}, []);
Sending Data
export async function updateUserPlaces(places) {
  const response = await fetch("http://localhost:3000/user-places", {
    method: "PUT",
    body: JSON.stringify({ places }),
    headers: {
      "Content-Type": "application/json"
    }
  });
  const data = await response.json();

  if(!response.ok)	throw new Error("Failed to update user data!");

  return data.message;
}
- Handler functions can be
async - Optimistic updating
- Change the UI immediately before sending data behind the screen
- Rollback the change if HTTP request fail
Working with Forms & User Input
What is Form
- HTML Forms
- The
forattribute of the<label>tag should be equal to theidattribute of the<input>element to bind them together- In JSX it’s named
htmlFor
- In JSX it’s named
- Each input field must have a
nameattribute to be submitted. If thenameattribute is omitted, the value of the input field will not be sent at all - Validating user input is the trickier part
Handling Form Submission
Form submission
- By default, the browser sends a HTTP request to the server when a button inside
formhas been clicked; therefore, the page will reload - This can be a problem when there is no handler for this request on the server (React app)
- Solution
<button type="button"></button>- Refactor from
<button onClick={handler}></button>to<form onSubmit={handler}></form>+e.preventDefault()- Suggested way
- By default, the browser sends a HTTP request to the server when a button inside
Getting user input via
state- Two-way binding for updating inputs:
onChange={handler}+setState(e.targer.value) - Make it generic by creating object
stateand refactoring to one handlerhandlerInputChange(identifier, e)
- Two-way binding for updating inputs:
Getting user input via
ref- Link
refstoinputelements - Have to use
refto manipulate DOM directly which is not recommended - Cannot bundle
refsinto one object
- Link
Getting user input via
FormData& native Browser APIs- Useful for handling form that has lots of inputs
- Example
function handleSubmit(e) {
  e.preventDefault();

  const fd = new FormData(e.target);
  const acquisition = fd.getAll("acquisition");			// get all values asscoiated with a given input name
  const data = Object.fromEntries(fd.entries());
  data.acquisition = acquisition;
}
Resetting Form
<button type="reset">Reset</button>; or,- Reset
state; or, ref.current.value = ""; or,e.target.reset()e.targetis the form element
Validating User Input
Compute the
isValidlogic and render conditionallyAlways add
onSubmitvalidationValidating input on every key stoke via
state- Errors may be shown too early
Validating input upon lost focus
OnBlue={handleInputBlur}- Errors may not disappear when the user starts to type again
Combining validating on key stoke and lost focus is a good pattern
Validating input upon form submission
Validating input via built-in validation
propstype,required, etc.
Combining custom and built-in validation logic is also a good pattern
Building Custom Solutions
- Custom
InputComponent - Custom
useInputHook - Outsource validation logic
- Use third-party form libraries
Redux
What is Redux
Redux is a state management system for cross-component or app-wide state
Redux can be used anywhere without React
Core concept of Redux
Redux Toolkit
Redux Toolkit (also known as “RTK” for short) is our official recommended approach for writing Redux logic
The
@reduxjs/toolkitpackage wraps around the corereduxpackage, and contains API methods and common dependencies that are essential for building a Redux appIf you are writing any Redux logic today, you should be using Redux Toolkit to write that code!
Why using Redux
- Potential problems of
context- Deeply nested components
- Complex providers
- Performance issue from high-frequency changes
- Redux is most useful in cases when:
- You have large amounts of application state that are needed in many places in the app
- The app state is updated frequently
- The logic to update that state may be complex
- The app has a medium or large-sized codebase, and might be worked on by many people
- You need to see how that state is being updated over time
- When(and when not) to reach for Redux by Mark Erikson
- In a nutshell, use the tool when you need it
How to use Redux
Redux Core
Store
The current Redux application state lives in an object called store
const redux = require("redux");
const store = redux.createStore(counterReducer);

console.log(store.getState());
// {value: 0}
Subscriber
const state = store.getState();
store.subscribe(render);
Selector
const selectCounterValue = state => state.value
const currentValue = selectCounterValue(store.getState())
Dispatch
The Redux
storehas a method calleddispatchThe only way to update the
stateis to call store.dispatch(action)The
storewill run itsslice reducerfunction and save the newstatevalue insidestore.dispatch({ type: 'counter/increment' })Typically we call
actionCreatorto dispatch the rightactionconst increment = () => { return { type: 'counter/increment' } } store.dispatch(increment()) console.log(store.getState()) // {value: 1}
Reducer
Reducer is a function that receives the current
stateand anactionobject, decide how to update thestateid necessary, and return the newstateYou can think of a
reduceras an event listener which handles events based on the received action (event) typeReducer should be a pure function
- They must not do any asynchronous logic, calculate random values, or cause other “side effects”
State should be immutable
const initialState = { value: 0 }

function counterReducer(state = initialState, action) {
  // Check to see if the reducer cares about this action
  if (action.type === 'counter/increment') {
    // If so, make a copy of `state`
    return {
      ...state,
      // and update the copy with the new value
      value: state.value + 1
    }
  }
  // otherwise return the existing state unchanged
  return state
}
Action
An
actionis a plain JavaScript object that has atypefieldYou can think of an action as an event that describes something that happened in the application
The
typefield should be a string that gives this action a descriptive name. We usually write that type string like"domain/eventName", where the first part is the feature or category that this action belongs to, and the second part is the specific thing that happenedAn action object can have other fields with additional information about what happened. By convention, we put that information in a field called
payloadconst addTodoAction = { type: 'todos/todoAdded', payload: 'Buy milk' }
Action Creators
An action creator is a function that creates and return
actionobjectIt is typically used so we don’t have to write the
actionobject by hand everytimeconst addTodo = text => { return { type: 'todos/todoAdded', payload: text } }
React-Redux Application Contents (Modern way)
- Redux allows
storesetup to be customised with different plugins (middlewareandenhancers)
// store.js
import { configureStore } from '@reduxjs/toolkit'
import counterReducer from '../features/counter/counterSlice'

export default configureStore({
  // root reducer
  reducer: {
    // slice reducer
    counter: counterReducer
  }
})
// When we pass in an object like {counter: counterReducer}, that says that
// we want to have a state.counter section of our Redux state object, and that
// we want the counterReducer function to be in charge of deciding if and
// how to update the state.counter section whenever an action is dispatched.
- A “redux slice” is a collection of Redux reducer logic and actions for a single feature in your app, typically defined together in a single file. The name comes from splitting up the root Redux state object into multiple “slices” of state
// counterSlice.js
import { createSlice } from '@reduxjs/toolkit'

export const counterSlice = createSlice({
  name: 'counter',
  initialState: {
    value: 0
  },
  reducers: {
    increment: state => {
      // Redux Toolkit allows us to write "mutating" logic in reducers. It
      // doesn't actually mutate the state because it uses the immer library,
      // which detects changes to a "draft state" and produces a brand new
      // immutable state based off those changes
      state.value += 1
    },
    decrement: state => {
      state.value -= 1
    },
    incrementByAmount: (state, action) => {
      state.value += action.payload
    }
  }
})

// action creators
export const { increment, decrement, incrementByAmount } = counterSlice.actions

// reducer function
export default counterSlice.reducer

// selector
export const selectCount = state => state.counter.value
- The
React-Reduxlibrary has a set of custom Hooks that allow your React component to interact with a Reduxstore - React components can’t talk to the Redux
storedirectly, because we’re not allowed to import it into component files
// Counter.jsx
import React, { useState } from 'react'
import { useSelector, useDispatch } from 'react-redux'
import {
  decrement,
  increment,
  incrementByAmount,
  incrementAsync,
  selectCount
} from './counterSlice'
import styles from './Counter.module.css'

export function Counter() {
  // Reading data with useSelector
  const count = useSelector(selectCount)
  // Dispatch actions
  const dispatch = useDispatch()
  const [incrementAmount, setIncrementAmount] = useState('2')

  return (
    <div>
      <div className={styles.row}>
        <button
          className={styles.button}
          aria-label="Increment value"
          onClick={() => dispatch(increment())}
        >
          +
        </button>
        <span className={styles.value}>{count}</span>
        <button
          className={styles.button}
          aria-label="Decrement value"
          onClick={() => dispatch(decrement())}
        >
          -
        </button>
        <button
          className={styles.button}
          aria-label="Increment value by amount"
          onClick={() => dispatch(incrementByAmount(incrementAmount))}
        >
          -
        </button>
      </div>
      {/* omit additional rendering output here */}
    </div>
  )
}
- Providing the
store
// index.js or main.jsx
import React from 'react'
import ReactDOM from 'react-dom'
import './index.css'
import App from './App'
import store from './app/store'
import { Provider } from 'react-redux'

ReactDOM.render(
  <Provider store={store}>
    <App />
  </Provider>,
  document.getElementById('root')
)
Writing async logic
Inside
useEffect(), listening tostatechange- A potential problem
useEffect()send the initial (i.e. empty) data to our backend and overwrite any data stored there- Use an if block to skip the first execution
- A potential problem
Using
thunkthunkis a programming term that means “a piece of code that does some delayed work”- Using thunks requires the
redux-thunkmiddleware to be added to the Redux store as part of its configuration - A
thunkfunction is a function that accept two arguments: Reduxstoredispatch()method andgetState()method thunkfunction are not directly called by application code, instead, they are passed tostore.dispatch()- We normally use custom action creator to generate
thunkfunction - A
thunk action creatoris a function that may have some arguments, and returns athunkfunction thunkgives us a place to put side effects
// the outside "thunk creator" function
const fetchUserById = userId => {
  // the inside "thunk function"
  return async (dispatch, getState) => {
    try {
      // make an async call in the thunk
      const user = await userAPI.fetchById(userId)
      // dispatch an action when we get the response back
      dispatch(userLoaded(user))
    } catch (err) {
      // If something went wrong, handle it here
    }
  }
}

// use arrow function
export const fetchUserById = userId => async dispatch => {
  const user = await userAPI.fetchById(userId);
  dispatch(userLoaded(user))
}
Redux Application Data Flow
- Redux data flow is one-way
- Initial setup:
- A Redux store is created using a root reducer function
- The store calls the root reducer once, and saves the return value as its initial
state - When the UI is first rendered, UI components access the current state of the Redux store, and use that data to decide what to render. They also subscribe to any future store updates so they can know if the state has changed.
- Updates:
- Something happens in the app, such as a user clicking a button
- The app code dispatches an action to the Redux store, like
dispatch({type: 'counter/increment'}) - The store runs the reducer function again with the previous
stateand the currentaction, and saves the return value as the newstate - The store notifies all parts of the UI that are subscribed that the store has been updated
- Each UI component that needs data from the store checks to see if the parts of the state they need have changed.
- Each component that sees its data has changed forces a re-render with the new data, so it can update what’s shown on the screen
React Router
Client-side code simply watches url changes and then loads different React components, instead of fetching new html files
Application content
npm install react-router-domAdding a router
// index.js import * as React from "react"; import * as ReactDOM from "react-dom/client"; import { createBrowserRouter, RouterProvider, } from "react-router-dom"; import "./index.css"; import HomePage from './pages/Home'; import ProductsPage from './pages/Products'; const router = createBrowserRouter([ { path: "/", element: <HomePage />, }, { path: "/products", element: <ProductsPage />, }, ]); ReactDOM.createRoot(document.getElementById("root")).render( <React.StrictMode> <RouterProvider router={router} /> </React.StrictMode> );- Due to the decoupling of fetching and rendering in the design of the data APIs, you should create your router outside of the React tree with a statically defined set of routes
createBrowserRouter()
Navigating between Pages with Links
- Prevent default behavior that sending request to the server and restart the React application
// Home.jsx import { Link } from 'react-router-dom'; // omitted <Link to={"/products"}>Products</Link>Navigating programmatically
Nested Routes
- Wrapper page that wraps other pages
// Root.js import { Outlet } from 'react-router-dom'; export default Root() { return ( <> <Navbar /> <Outlet /> </> ); } // index.js // omitted const router = createBrowserRouter([ { path: "/", element: <Root />, children: [ { index: true, element: <HomePage />, }, { path: "/products", element: <ProductsPage />, }, ] } ]);- Index routes
- When a route has children, and you’re at the parent route’s path, the
<Outlet>has nothing to render because no children match - You can think of index routes as the default child route to fill in that space
- When a route has children, and you’re at the parent route’s path, the
Dynamic Routes
// index.js // omitted const router = createBrowserRouter([ { path: "/", element: <Root />, children: [ { index: true, element: <HomePage />, }, { path: "products", element: <ProductsPage />, }, { path: "products/:id", element: <ProductDetailPage /> }, ] } ]); // ProductDetail.jsx import { useParams } from 'react-router-dom'; export default function ProductDetailPage() { const { id } = useParams(); return ( <> <p>{id}</p> </> ); }- Dynamic Segments
- If a path segment starts with
:then it becomes a “dynamic segment” - When the route matches the URL, the dynamic segment will be parsed from the URL and provided as
paramsto other router APIs
- If a path segment starts with
useParams()
- Dynamic Segments
Handling error pages
// Error.jsx import { useRouteError } from "react-router-dom"; export default function ErrorPage() { const error = useRouteError(); console.error(error); return ( <div id="error-page"> <h1>Oops!</h1> <p>Sorry, an unexpected error has occurred.</p> <p> <i>{error.statusText || error.message}</i> </p> </div> ); } // index.js // omitted const router = createBrowserRouter([ { path: "/", element: <Root />, errorElement: <ErrorPage />, } ]);- 404 NOT FOUND
Relative & Absolute Paths
- Absolute path
- Path starts with
/ - Describes the location from the root directory
- Path starts with
- Relative path
- Describes the location of a file relative to the current (working) directory
* - Two dots (
..) represent moving to a parent directory - The single dot indicates your current location
- Describes the location of a file relative to the current (working) directory
- Absolute path
Authentication
Styling React Components
Styling with vanilla CSS
- Import CSS file into corresponding JSX file
- Pros
- CSS code is decoupled from JSX code
- Cons
- You need to know CSS
- CSS is not scoped to components, CSS rules may clash across components
Scoping Styles
- Use inline
styleattribute- The value is an object, not a string
- Use CSS modules
- Change
Component.csstoComponent.module.css - Change
import "./Component.css"toimport classes from "./Component.module.css" <p className={classes.paragraph}>test</p>
- Change
- CSS-IN-JS Styling with “Styled Components”
- Use a package Styled components
Styling with Tailwind CSS
- The main idea of Tailwind: add tiny utility CSS classes to HTML elements
- Tailwind website
Dynamic Styling
- Dynamic inline styling
- Dynamic styling by add class name to component dynamically, using template literal
Animating
Just CSS
transition@keyframesandanimation
Framer Motion
Testing
Manual testing
- Write code -> Preview -> Improve code -> Repeat
- Error-prone
Automated testing
- Write code that automatically tests your code
- Unit test
- Test the individual building blocks in isolation
- Integration test
- Test the combination of multiple building blocks
- End-to-End(E2E) test
- Test the complete scenarios / user flows in your app
Testing tools (popular) for React
- Tool for running our tests and asserting the results
- Jest
- Tool for “simulating” our React app
- React Testing Library
- Tool for running our tests and asserting the results
How to write a test
Arrange: set up test data, conditions, and environment
Act: run logic that should be tested
Assert: compare execution results with ecpected results
// Component.test.js
describe("Testing suite A", () => {
  test("Test A", () => {});
  test("Test B", () => {});
});
Deployment
- Deployment steps
- Test code
- Optimise code
- Build app
- Upload app
- Configure server
- Lazy loading
- Load certain components only when they are needed instead of ahead of time
- Refactor from import at the top to
lazy(),import(),<Suspend fallback={}></Suspend>
- Client-side routing & server-side routing